Hi guys!...okay probably mostly gals here on this blog =)
I just saw a cool idea! ---
I'm following this girl's blog. She's a youtuber and she made her own lightbox set up for product photography. She also gave a site where she got the ideas and tutorial from.
I think I'm going to try it!
I feel bad I haven't updated this blog in a few weeks. I'm back home and have been doing a lot of shopping! Mostly clothes and some nail polish and a few hair stuff and other miscellaneous stuff =D..so actually I do have a lot of stuff I could blog about!
But first when I get back I want to try to set up a lightbox so I could post good pictures on products I"ll be talking about here!
Laterz! Promise!
Saturday, December 18, 2010
Sunday, November 28, 2010
Clean Brushes
Thanks Michelle Phan!! Michelle Phan is a really famous guru youtuber and she has a really good tutorial on how to clean make up brushes. You can watch the video in the post below this post. I basically followed everything she suggested with a few of my own "steps" in between..=).
* If you do not have brush guards just dry them with tissue paper and lay them on their side but laying the top of the handles on something like a book or towel so water won't get into the funnel area which can ruin the brush.
 |
| 1. I used EVOO (extra virgin olive oil) and baby shampoo. Even though in youtube she uses anti-bacterial dishwashing soap. I don't mind if it's not anti=bacterial. I pumped like 15 pumps out of the baby soap and then around 2/3rds of EVOO. |
 |
| My brushes all ready to be cleaned! |
 |
| This is not the natural color of my brushes...they're super dirty here =) |
 |
| 2. So just like Michelle Phan did: I swirled my brushes with the EVOO and baby shampoo and then brushed it on my hand. |
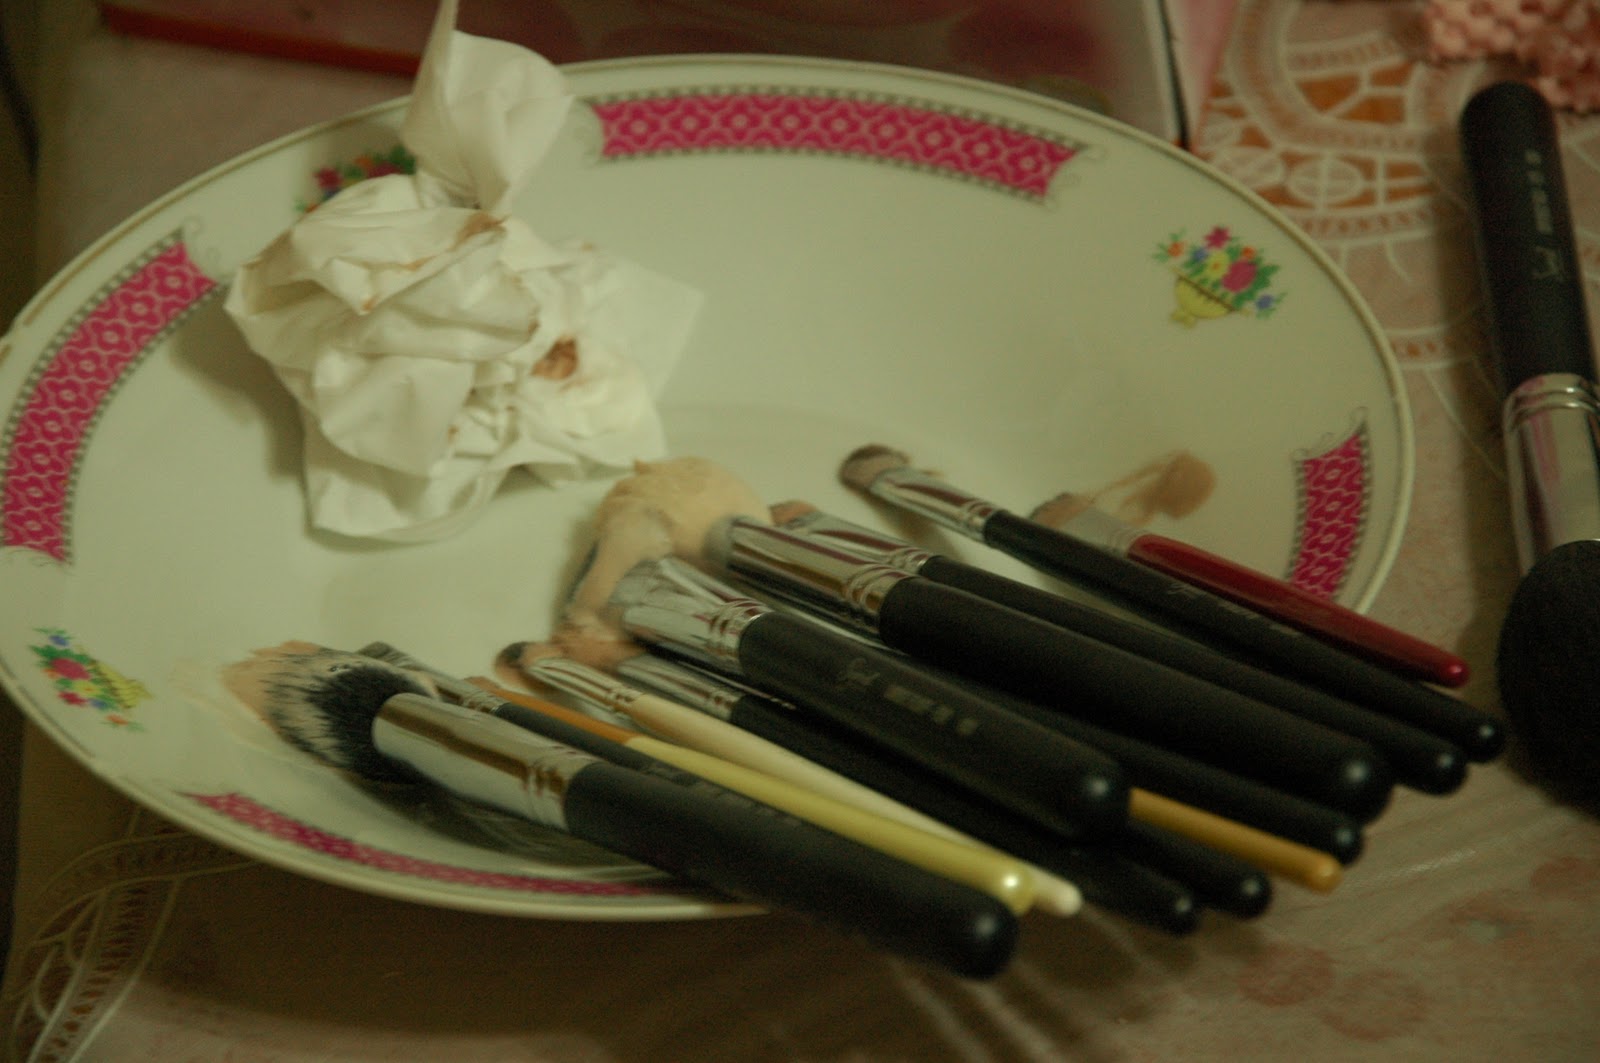 |
| 3. Then after swirling and brush withs soap on the plate and hand I left them in this plate. A plate where the brushes can be slanted downwards so the liquid does go down the funnel and spoil the brush. |
 |
| See the brushes compared to the 3rd picture?! This is what they're supposed to really look like. |
 |
| 4-5-6. Go to the sink and wash the brushes careful to only wash the bottom area and not let the whole brush be soaking wet. Dry them as much as I can with some paper towel. Put them in my home-made brush guard (I did a post on this previously). And lean it agains the wall to dry up. |
 |
| 7. Once the brushes are not "soaking" wet and almost dry I take them out of their brush guard to "breathe" and fully dry. I put my plate upside down so that the brushes are slanted downwards to prevent any liquid from getting deep into the brushes. |
Friday, November 26, 2010
Ipanema Slippers/Sandals/Thongs(?)
 |
| Purple!! |
 |
| Silver! |
Tuesday, November 16, 2010
Looks Easy Nails!
I came across this youtuber who does really pretty nails and her techniques looks so simple! I can't wait to try some of her ideas out. Maybe you can try it out for yourself first? =D
The next 3 posts are on the videos I came across...I tried to embed it into one post it still doesn't work =(
The next 3 posts are on the videos I came across...I tried to embed it into one post it still doesn't work =(
Makeup Face Routine
Just want to share with you on what I apply on my face before apply eye, cheek and lip make up. Basically my focus is to cover my spots and try to make it last long as I have ridiculous oily face.
So here's a before and after picture and the products I used with a little explanation:
I don't really wanna show such a large close up picture of my face but...what to do? hehehe

So here's a before and after picture and the products I used with a little explanation:
I don't really wanna show such a large close up picture of my face but...what to do? hehehe
 |
| Before |
 |
| After...then I put my eye, cheek and lip make up this is just the "foundation" |

Products used (from left to right and in this order on my face):
- Sephora's Make up primer - helps mattify areas that become oily and to keep make up together longer. I apply this all over my face.
- BB Cream - from Nature Republic (Korean Brand). It's in between a foundation and a tinted moisturiser. It supposedly help acne prone skin and reduces redness. I apply this all over my face.
- ZA's concealer (#2) - I apply this on my spots and scars, under eye area, etc. It is of a liquid consistency
- Revlon's Mineral Foundation - My dermatologist told me to avoid using liquid products on my face so I use loose powder foundation as thick foundation makes me break out. I apply this with my Kabuki brush all over my face. It also helps to set my concealer.
- Make Up Forever Concealer Pallette - I use this to cover whatever spot are still visible.
- Garnier's Light Face powder - This is new to me I used to use Oriental Princess's loose powder. I apply this with my face brush to set the rest of the make up. This powder is pretty good but I'm still searching for a better one. At least it doesn't make me break out.
This is just the latest way I "do" my face. Before this I only used any concealer on hand (Face Shop's one is good), Revlon's Mineral Foundation and Oriental Princess Loose Powder. This face routine lasts much longer and has better coverage for me though...still trying to improve and will share when I find anything better.
Of course I also put moisturizer and sunblock before anything.
French Nails & Etc
Bought a set of base coat, rose colored, white and top coat nail polish to make French Nails. I bought it for a few dollars in some cheap-o beauty store hehe....Turned out pretty good though!...Dunno if you can see =)


The 2 pen like ones are a corrector pen (the bigger,rounder one) and a white nail pen.
The corrector pen helps to "erase" nail polish that was accidentally painted outside of your nails.
The white nail pen looks like a lip/eye liner and you just dip it into lukewarm water and color the underside of the tips of your nails for a whiter cleaner look.


The corrector pen helps to "erase" nail polish that was accidentally painted outside of your nails.
The white nail pen looks like a lip/eye liner and you just dip it into lukewarm water and color the underside of the tips of your nails for a whiter cleaner look.
YeS,Finally
I've always heard of Cover Girl's Lash Blast mascara and finally I have one of my own! Thanks to mascara.page!

I Shall blog on other stuff I got from mascara.page soon!

I Shall blog on other stuff I got from mascara.page soon!
Saturday, November 13, 2010
Check this out!

Click on the picture above to go this wonderful site I discovered! I can buy products I've been wanting but couldn't find here in SG or Asia!...The price is REAAALLLyY seriously good compared to drugstore make ups even!
I got a bunch of stuff already and I can't wait to blog on it once my break comes =)
But yeah I was seriously ecstatic when I came across this page accidentally...I forgot how but it was fate! haha...actually it was through some random Singaporean's blog I came across where she mentioned she said she bought Covergirl's Lashblast Mascara from this site.
I also wrote a testimonial so you can read how I feel about it by going to the testimonial section =) ...I juuuuust wrote it so it still needs to be approved =P
Have a nice day and week!
Thursday, November 11, 2010
Can't Wait
I can't wait to update this blog!
I've been so busy but I have sooo many things I want to share with you guys!
It's just that it takes more time to take the pictures and explain and upload it...but soon...yes very soon...I will have all the time in the world...MUHAHAHA...for now I'm just doing little spurts of updates on my personal blog...
Laterz!
Friday, November 5, 2010
Eye Brushes
These are the 4 eye shadow brushes I used for my 4-Step eyeshadow post.
 |
| From left to right: 1. Eye Shading Brush (medium sized used for lids) 2. Blending Brush (Oval-shaped brush with gently chiseled sides used for the crease) 3. Tapered Blending Brush (Fluffy, long-bristled brush with tapered tip used for the outer corner) 4. Large Fluff Brush Brushes 2 and 3 can be used vice versa. |
These brushes are brushes from Sigma.
4-Step Eyeshadow
I got my sister and myself a Coastal Scents 28 piece Eye Shadow Neutral Palette. This post is to help her get started on using he eyeshadows. This is my "theory" and how I use it...like I said I'm no professional! =D
 There are so many colours that I didn't know where to start!
But I got an idea from Maybeline's eyeshadow quad in Sunlit Bronze. At the back of this palette they tell you how and where to put on the shadows.

 So basically there are four areas to use the shadows: The lid, the crease, the outer corner and the brow bone.
So from that basic step that's how I've been using my eye shadows.
You just need to make sure that 1.) the colours will blend well or look good together and 2.) The one on the lid is lighter colour than the crease, the crease is darker than the lid colour, and the outer corner is darkest (usually dark brown,black or grey). The brow bone colour is always the lightest and is the hi-lighter. So this applies with any eyeshadow you're using.
First off in this Coastal Scents 28 Piece Neutral Palette I'm using, the first 2 rows on the right are hi-lighter colours and you can use which ever one you feel like.
Ok so here are some of the colours I have use together...there are more but I forgot the combination... #1 is for the lid, #2 is for the crease, #3 is for the outer corner and #4 is for the brow bone. From here you can play around with whatever colours you like and I'm sure it'll turn out just fine because it did with me!


My motto?...if I can do it so can you!

But I got an idea from Maybeline's eyeshadow quad in Sunlit Bronze. At the back of this palette they tell you how and where to put on the shadows.


 |
| 1. Lid - Just sweep the brush left and right across you eye lid. |
 |
| 2. Crease - "dig in" and sweep the brush back and forth where your crease is. |
 |
| 3.Out Corner - Blend in circular motion |
 |
| 4. Brow bone - Sweep across you brow bone the are under your eye brows and the edge of your other eye shadows |
You just need to make sure that 1.) the colours will blend well or look good together and 2.) The one on the lid is lighter colour than the crease, the crease is darker than the lid colour, and the outer corner is darkest (usually dark brown,black or grey). The brow bone colour is always the lightest and is the hi-lighter. So this applies with any eyeshadow you're using.
First off in this Coastal Scents 28 Piece Neutral Palette I'm using, the first 2 rows on the right are hi-lighter colours and you can use which ever one you feel like.
Ok so here are some of the colours I have use together...there are more but I forgot the combination... #1 is for the lid, #2 is for the crease, #3 is for the outer corner and #4 is for the brow bone. From here you can play around with whatever colours you like and I'm sure it'll turn out just fine because it did with me!


My motto?...if I can do it so can you!
Thursday, November 4, 2010
Nail Polish Remover
I haven't blogged in a few days and and just want to blog.
Luckily (or unluckily? haha) I have some photos I took that I haven't blogged on yet already in my computer.
Luckily (or unluckily? haha) I have some photos I took that I haven't blogged on yet already in my computer.
 |
| On the right is the Sally Hansen's Nail Polish Remover I think it's my 2nd or 3rd bottle since moving here. It's around almost S$6 !! Yeah, when I first bought it when I came here I was like this is the most expensive nail polish remover I have ever bought in my life as I have always bought the 15 baht ones in BKK. Of course you can find the cheap 15 baht like ones here but I like using the drug store ones now since S$5 $6 is still considered "Ok" here. Oh and on the left is the Guardian nail polish remover which is like S$2 cheaper than the Sally Hansen's one. It works as well too. They are 200 and 235.5 ml |
 |
| I prefer the Guardian one as it has a small opening for the product to come out. The opening of the Sally Hansen's one is gigantic and I spilt like half on my laptop once. Thank goodness my laptop has a protective cover....*shivers down my spine |
 |
| Sally Hansen's one is supposedly moisturizing for dry, brittle nails...but how can nail polish remover be moisturizing?...doesn't work for me at all so after removing my nail polish I use hand and nail lotion. I think I got this at Guardian or Watsons forgot how much. |
That's all!
Tuesday, November 2, 2010
B4 and AFTER!
I brought my make up to work and while waiting for the bus to bring me to the evangelistic meeting...I just put it on. I decided to take a picture before my make up and after. I've got to go soon so I can't go into details about what I used yet coz of lack of time!.... but yeah one reason I love make up it covers my spots!!


Before as in just moisturizer on me face...

After....as in all the junk on me face! haha...

This was yesterday's look (Just the eyeshadow has changed)

Friday, October 29, 2010
Hard As Wraps - Update/Review
Last Sunday I blogged about a new Sally Hansen's Hard as Nails, Hard as Wraps nail polish I purchased which is normally quite pricey but I got at it half price. (Click here to go to that post)
We it's been 5 days since I painted my nails with it and now it's time to tell you the results. First here are the pictures of my finger nails 5 days after painting it...

Let's see of their 2 claims about their product are true:
1. FLAWLESS COLOR THAT LASTS (4/5 stars)
As you can see [kind of] see the nail polish has worn off on all finger nails. They claimed that the color would last longer but for me it lasted about the same time as the cheaper versions of Sally Hansen's I have purchased. But my with my job and lifestyle (washing poopoo, kids hands, rubbing on hand sanitizer many times a day, shampooing my hair everyday, etc, etc..) Even the toughest, most expensive nail polish won't stay on perfectly for more than 5 days (actually it's started wearing off on the 3rd and 4th day already).
I give a 4/5 because it did last through my working days reasonably well and it's definitely better than those 3 for 15 baht nail polish hehe...I shouldn't compare I know...=D
2. NAILS THAT WON'T BREAK OR PEEL (5/5 stars)
It also claims that I will get hard nails that won't crack or peel. Well, guess what! It actually seems like it's working. Normally by now my nail polish is off because I've peeled the top layer of the finger nail off (they're terrible like that my nails!). But even as I try to force to peel my finger nail right now it won't budge!
Anyways, I gota prepare for church tonight. I'll put on a new layer of nail polish (after removing the old one of course), freshen myself up and head off. Have a nice weekend!
We it's been 5 days since I painted my nails with it and now it's time to tell you the results. First here are the pictures of my finger nails 5 days after painting it...

 |
1. FLAWLESS COLOR THAT LASTS (4/5 stars)
As you can see [kind of] see the nail polish has worn off on all finger nails. They claimed that the color would last longer but for me it lasted about the same time as the cheaper versions of Sally Hansen's I have purchased. But my with my job and lifestyle (washing poopoo, kids hands, rubbing on hand sanitizer many times a day, shampooing my hair everyday, etc, etc..) Even the toughest, most expensive nail polish won't stay on perfectly for more than 5 days (actually it's started wearing off on the 3rd and 4th day already).
I give a 4/5 because it did last through my working days reasonably well and it's definitely better than those 3 for 15 baht nail polish hehe...I shouldn't compare I know...=D
2. NAILS THAT WON'T BREAK OR PEEL (5/5 stars)
It also claims that I will get hard nails that won't crack or peel. Well, guess what! It actually seems like it's working. Normally by now my nail polish is off because I've peeled the top layer of the finger nail off (they're terrible like that my nails!). But even as I try to force to peel my finger nail right now it won't budge!
Anyways, I gota prepare for church tonight. I'll put on a new layer of nail polish (after removing the old one of course), freshen myself up and head off. Have a nice weekend!
Stitch Space Organiser
I bought a space organiser to put my cosmetics in. I bought it at Popular which is like the book store/stationary store that is most common and well known in Singapore (something like B2S in Thailand or Kinokuniya without the stationary).
It is 14" in lenght times 12" in width. The height is 7.5". The price was SGD 7.90.
It is cute and helps me store and move my makeup around the house all at one go =) HAHA why would I move it around the house? Well, sometimes I put on my make up in the bedroom and other times I put it on in the living room.
See, I'm a very simple person all the makeup/cosmetics I own in the world can fit into one small space. Of course that doesn't include my nail polish, nail polish remover, hair products, other body parts products...LoL....
Little by little I shall collect =P
It is 14" in lenght times 12" in width. The height is 7.5". The price was SGD 7.90.
 |
| The packaging |
 |
| Un packaged |
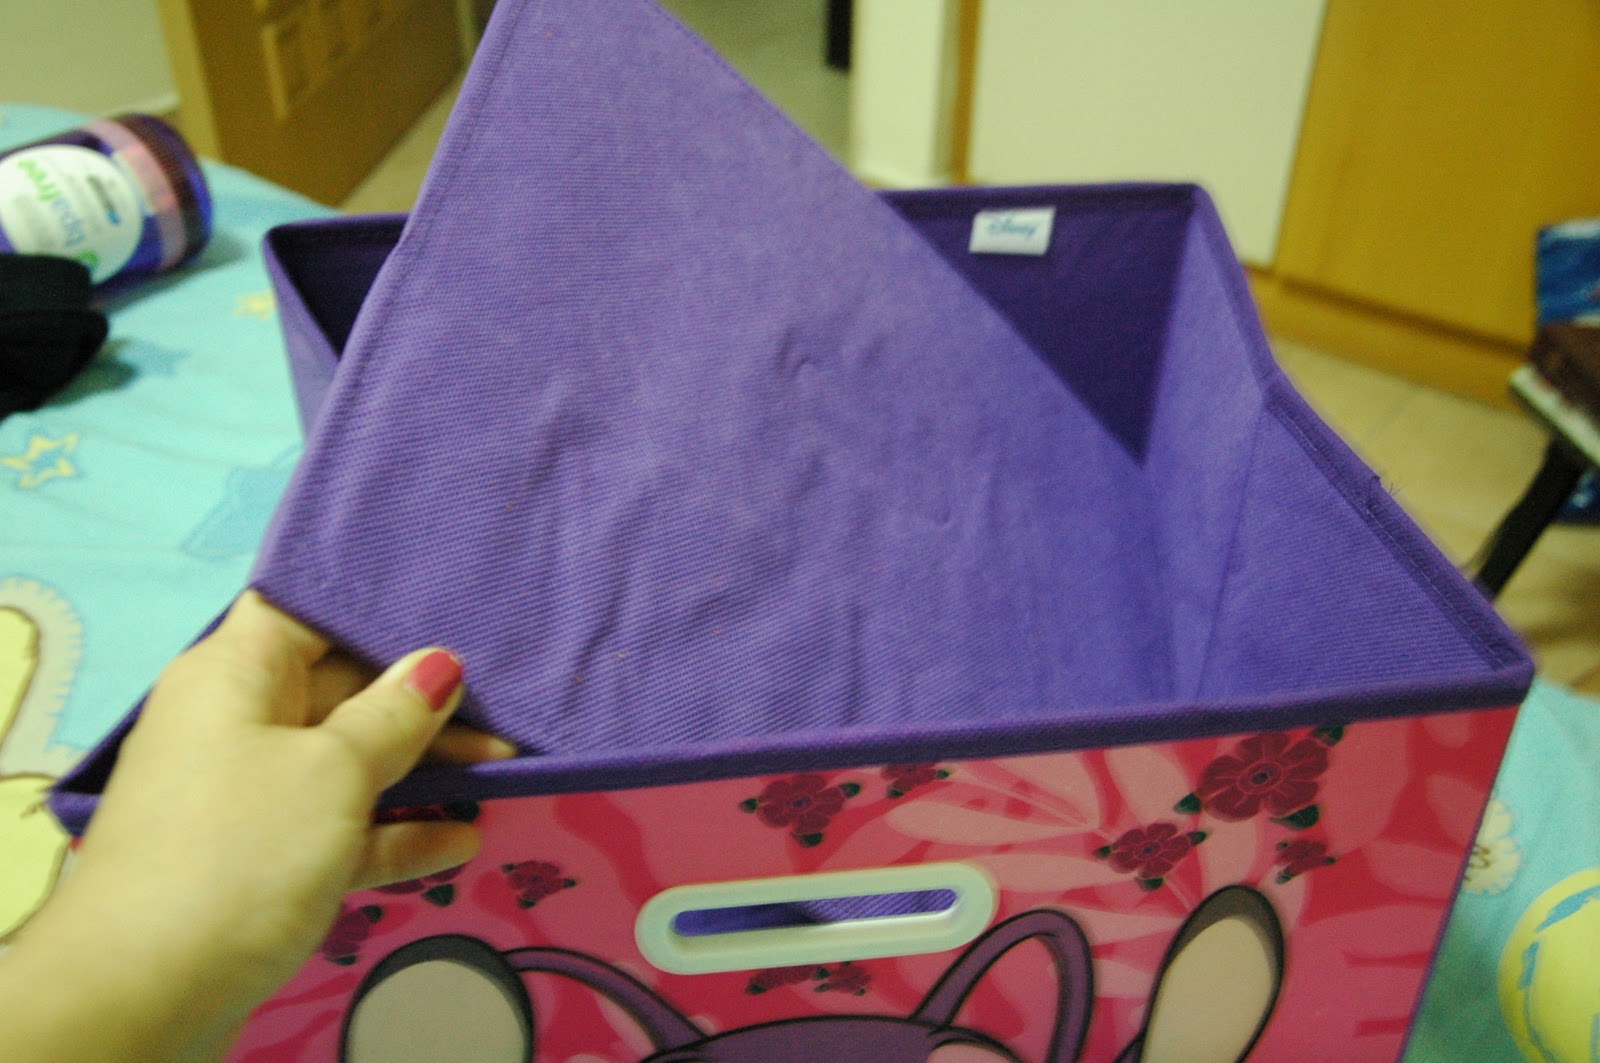 |
| "Assembling" This is like the " hard floor" of the organiser. |
 |
| tadaaa...can you see my 2 brush cases? =D From left to right: My 2 makeup bags, blush and eyeshadow pallettes My brush guards and 2 brush cases. |
 |
| Partnerss! Makeup and work storage..ha! Of course I don't just leave them on the floor like that. This is just for the purpose of picture taking! |
See, I'm a very simple person all the makeup/cosmetics I own in the world can fit into one small space. Of course that doesn't include my nail polish, nail polish remover, hair products, other body parts products...LoL....
Little by little I shall collect =P
Wednesday, October 27, 2010
Pencil Cases Turned Brush Cases
I have quite a collection of eye and face brushes and I wanted to have a cute and safe place for them. I haven't found any good or affordable brush rolls or cases but I found some really cute pencil cases that I used instead...

 |
| It can fit my 6 face/cheek brushes =) |
 |
  |
| It can fit 11 (and lots more if I had more..hehe) of my eye and lip brushes. It's made from thick cardboard and closes magnetically. |
I wish I could use it more often but I'll have to wake up earlier to beautify myself...hopefully next school year my work load won't be as tiring.
I've been planning to make my own brush roll (no sewing). I got the idea from this youtube video. Maybe during my holidays I could work on it.
Oh by the way I got both pencil cases at AMK Hub. On the 2nd floor. The pencil box at a stationary store (I forgot the name of the shop but it sells tons of notebooks) and the pink pencil case at a shop that sells like precious moments stuff...I"m not sure if the name of the shop is Precious Moments of something else.
Tuesday, October 26, 2010
Sister Style
I miss my sister.
I miss going shopping with her and getting her opinion and advice. She knows best! Especially for me!
But I'm so happy for Skype!
...So it was fun doing window shopping with her online and asking her what color was nice and what color suits me. =)
I can't wait to see her and go shopping and eating with her!
Monday, October 25, 2010
If...
You know what?...If I weren't working I swear this blog would be about me cooking and baking...I miss those days! =D But this is also good!
Do it Myself Brush Guards
I got this idea from a video in youtube...
Click here to watch the video
I don't know what those mats are called exactly so I will call them anti-slip mats. =)

I saw them selling 5 for a dollar at Fair Price (the Tops Supermaket of Singapore) and said why not?!
I tried to sew the first few but I suck at sowing so I decided to just tape it and it still works the same. As you can see in the picture below the one on the left is sewn and the one on the right is taped with regular scotch tape.

You just wrap the mat around your brush (any size brush) and cut it if you need to. Before sewing it or taping it test if the brush can slip through just right (not slip through easily or get stuck).
Basically this is to help keep [makeup] brushes in shape especially after washing them. The professional or "real" brush guards look like this:
Watch it here in Michelle Phan's youtube tutorial.
(Can someone help me I forgot how to put youtube videos straight onto my blog instead of having to link them) Thanks!
Click here to watch the video
I don't know what those mats are called exactly so I will call them anti-slip mats. =)

I saw them selling 5 for a dollar at Fair Price (the Tops Supermaket of Singapore) and said why not?!
I tried to sew the first few but I suck at sowing so I decided to just tape it and it still works the same. As you can see in the picture below the one on the left is sewn and the one on the right is taped with regular scotch tape.

You just wrap the mat around your brush (any size brush) and cut it if you need to. Before sewing it or taping it test if the brush can slip through just right (not slip through easily or get stuck).
 |
| 1. Here's my face brush |
 |
| 2. Here I'm sliding it in |
 |
| 3. And it fits just right! |
Watch it here in Michelle Phan's youtube tutorial.
(Can someone help me I forgot how to put youtube videos straight onto my blog instead of having to link them) Thanks!
Subscribe to:
Posts (Atom)